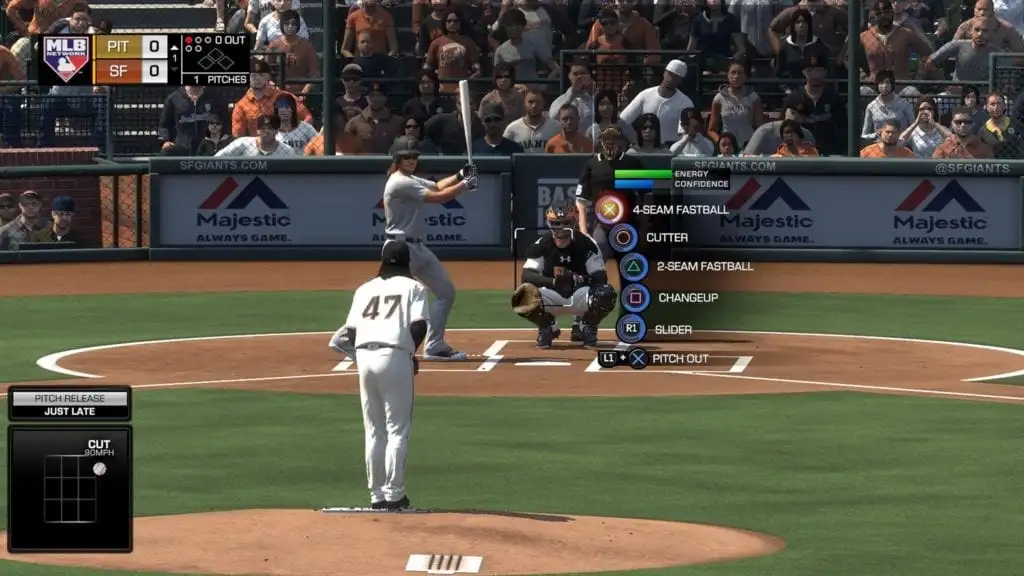
The mindset of a pitcher should be forever changing. Every hitter represents another battle that necessitates a new plan of attack. When these best-laid plans inevitably go awry because it’s impossible to execute perfectly and stymie whoever is at the plate with every pitch, it’s imperative that adjustments then be made on the fly. At times on the mound, you’re going to want to establish your dominance with an overpowering fastball on the inside corner. Elsewhere, you’ll be trying to set a hitter up with a pitch outside the zone, and ultimately, there will come a time when you’ll need to be ready to go in for the kill. Though every at-bat is bound to be its own slightly different struggle, the one constant will be the same counts that you’ll encounter over and over and over again. With that in mind, here are some thoughts on how to approach each of the different counts you’ll come across while pitching in MLB The Show 17.
0-0: The common rule of thumb whenever a new batter steps to the plate is that it’s always best to get ahead in the count. Of course, this doesn’t necessarily mean it’s a good idea to groove a fastball down the heart of the plate. Try nipping a corner with that fastball instead, or if you’ve already been using your fastball a lot to get ahead, start them with something off-speed at the knees. Alternatively, if you’ve noticed that your opponents have routinely swung at the first pitch, there are times when you may actually want to give them something out of the zone right off the bat and let them start to dig their own grave.
0-1: Now that you’ve taken command of the at-bat, you have a little more margin for error to work with. Whatever you decide to throw in this spot, it’s usually a good time to try to make the perfect pitch somewhere on the edges of the strike zone. If you hit your mark, then you’re way ahead at 0-2, but if you miss it’s not the end of the world to be even at 1-1.
1-0: You’ve fallen behind the hitter, but it’s hardly time to panic yet. It’s just become a bit more important now that you try to make this next pitch a strike. While you don’t want to throw one right down the gut just yet, you may want to bring your target a little more inside the margins of the strike zone.
1-1: When you’re back to even at 1-1, there are a lot of ways you can now go with this next pitch. Ideally, you want to stay ahead by throwing a strike, but remember that the pitcher still has the advantage here in that he gets four balls while the hitter only gets three strikes. That means the hitter should be more afraid to fall behind 1-2 than you are to fall behind 2-1. It’s a good situation to hang a breaking ball on the corner or entice them to swing at a fastball just outside the zone.
0-2: That poor hitter. Now you’re really in the driver’s seat and have him at your mercy. As tempting as it might be to go all Mortal Kombat and finish him, it’s often better to use a “waste” pitch here and get them to swing at something outside of the strike zone. A neck-high fastball or a breaking ball in the dirt can be your best bets at allowing hitters to strike themselves out.

2-0: Okay, so you’ve dug a bit of a hole for yourself at this point, but it’s not a code-red situation just yet and there’s still time to work your way out of trouble. You probably want to go to your most reliable pitch here and — though you may not want it to catch too much of the plate — it’s also not the kind of situation where you want to risk working the corners either. Bear in mind that the hitter is more than likely expecting a fastball and use this knowledge against him to perhaps get him out in front of a breaking ball.
2-1: This is often the biggest pitch in an at-bat as it’s sure to determine who will have a clear-cut advantage on the next pitch. You really don’t want to fall behind 3-1, but you also don’t want to leave something out over the plate that a hitter can crush. Whatever pitch and location you go to here, it’s never been more important to execute and hit your spot because missing this pitch can often be the one that causes an at-bat to unravel.
1-2: Here’s where you should start to at least think about putting a hitter away. There’s no harm in trying to make a perfect pitch on the corner or at the knees, but you can also think about throwing another waste pitch outside the zone. Whether they swing and miss or make weak contact, you’re still getting them to offer at the kind of pitch you want them to be offering at, meaning you claim victory in the at-bat. If you have one of those wipe-out sliders or a filthy breaking ball where the bottom drops out, now’s the time to deploy it.
3-0: How did this happen? Now you’ve really gone and done it. There’s no beating around the bush at this point: you’re going to have to throw a strike by any means necessary. And you’re probably going to want to steer clear of the corners and put it right down the pipe for the most part. Your best hope is that the hitter is taking all the way, but you could always throw something off-speed down the middle just to go against the grain and disrupt their timing if they’re swinging away.
2-2: Because you’d probably rather avoid a full count, you should really be focused on putting an end to the at-bat once and for all. The time for waste pitches has come and gone. You can still attempt to make a perfect pitch on the edges if you like because — especially against more dangerous hitters — it’s not smart to give in yet and throw them something that hangs out over the plate too much. Remember that you still have another pitch to play with but their back is already against the wall.
3-1: The good news is that the situation isn’t quite as dire as 3-0, but the bad news is the hitter is probably going to be swinging away at this one. Of course you’re going to want the pitch to be somewhere over the plate, so concentrate instead on throwing the kind of pitch you think they might be least expecting. Most hitters will probably be sitting dead red on a fastball since they’re all too aware that you’re in desperate need of a strike so, in most situations, consider showing them anything else you feel confident you can get over for a strike.
3-2: Ah, the payoff pitch. You’ve worked so hard to get here and now it’s time to win the battle when all of the chips are on the table. Naturally, you want to try to throw a strike, but the trouble is hitters are acutely aware of this. This is where who’s at the plate becomes more important than ever. While you can often get away with giving in to lesser hitters and throwing them something over the plate to avoid conceding a walk, the elite hitters can really do damage on a 3-2 pitch. That’s why you can always try to pitch to the edges (or even beyond) against these superior batsmen and either you hit your spot and hopefully get an out or you learn that allowing a walk is not always the worst thing when it means you to live to fight another day.